In this blog, you will learn on how to Implement Roles and claims based authentication.
You will also understand what is the difference between roles and claims on implementation and also understand which use cases you should use claims and roles.
You will also understand what is the difference between roles and claims on implementation and also understand which use cases you should use claims and roles.
- First Step is to create a new ASP.Net identity Project from the MSFT Doc link. https://docs.microsoft.com/en-us/aspnet/identity/overview/getting-started/adding-aspnet-identity-to-an-empty-or-existing-web-forms-project
- Add a new folder called App_Start.
- Add a class file called WebApiConfig.cs to the App_Start folder.
- Copy the below code to WebApiConfig.cs, this where your routing url definition is done. Below code represents what url is navigated by default to access your web api.
- Right click on project, select ADD=>New Item=>Search for Global.
- Click on add, remove all method except Application_Start in Global.asax.cs and add the below code to the Global.asax.cs . Incase System.web. Http is not found, then Install-Package Microsoft.AspNet.WebApi
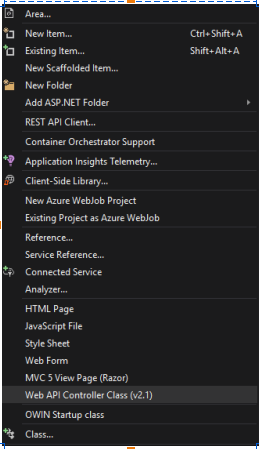
- Now add new controller to test the whether routing we have implemented is working or not. Right click on project => Add => "Web API Controller Class" and name the controller.
- Name the controller as ProductController
- Open the chrome browser and enter URL: http://localhost:{yourportno}/api/product
- Now start adding authorization to the contoller. Add [Authorize] to the ProductController.
- Now when you try to navigate the same product url without logging in, you will get 404 error.
- Now let us add code to make it Roles based access application.
- Add the below code to startup.cs. Inside the same namespace.
- Now we will add roles to register web page, so we can access the product controller based on the roles.
- Add below code to register.aspx as below between username and password. You can find the code here.
- In Register.aspx, change the code as below.
- Now create user with name admin with adminstrator role and another user with name productowner with product owner role.
- Change the Authorize atribute to Authorize(Roles = "productowner")
- Now close the browser and login into the app using admin user, you should error page.
- Now close the browser and login into the app productowner user, you should see value1 and value2, with success response.
- Major problem with the roles, if we want to give one of the product owner say sam who dont have access to create a product then you might have to add another role. This is huge problem because you cannot keep adding role for every action that needs to denied or access given.
- This is why claims comes into picture where you can give action based access to the controller than the roles based access to the controller. A claim is a name value pair that represents what the subject is, not what the subject can do.
- Now we will start implementing claims by making changes in the register.aspx as below.
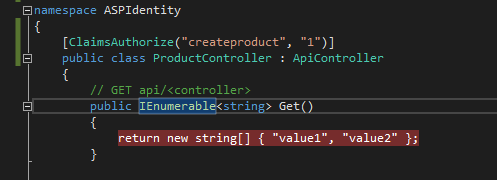
- Let us add ClaimsAuthorizeAttribute class to authorize based on claims.
- Now add attribute to the product controller as below. [ClaimsAuthorize("createproduct", "1")].
- Now add a user named productaccess which will add createproduct claims based on the step 23.
- Now login with productaccess and test the product controller, you can access the product controller.
- Now login with productowner user and test the product controller, you will not get unauthorizedexception


When you compare the role based access authorize attribute and custom claim filter attribute, you can see, when you want to change the access to one user, you just need to add or remove the claims from the user alone and will not affect any other roles that are defined. That is advantage of using claims instead of roles


