We will start the blog with assumption that you are familiar with angular 2 and ionic 1.0 and we will see how the ionic 2 is setup with the Web API as backend.
You can get the source code @ https://github.com/karthikeyanVK/Ionic2WebAPI.Net
Setup Ionic for Mobile development
- Open a specific folder for development
- Right click and open “Git Bash here”
- Run command “npm install -g cordova ionic” in git bash
- Run command “ionic start TodoApp blank --v2” , -v2 means ionic 2
- Navigate to TodoAPP folder “cd TodoApp”
- Run ionic serve to test the app
- Run “ionic platform add android”
Once the todoapp is created make sure you add the app modules in the https://github.com/karthikeyanVK/Ionic2WebAPI.Net as in there, better to copy paste the files as it is
In this blog we will only concentrate on the todo folder
First we will add the todo.ts that displays the available tasks of your mobile app. You can get the file @ todo.ts

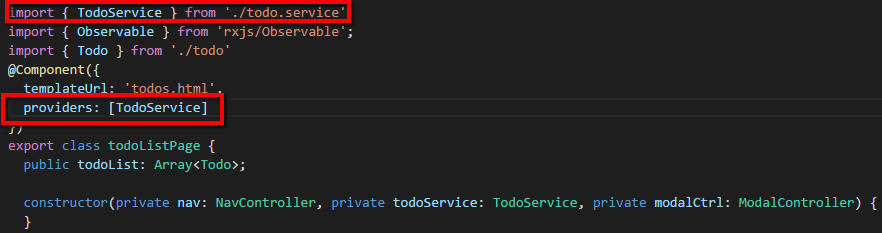
As in above you need to include all the import available there, NavController, ModalController are used for navigational purpose. Look into the constructor we have utilized NavController, ModalController and also todoservice, which is used to get the task from the database which we will go through later in the blog.
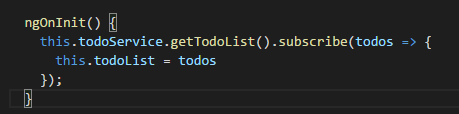
In the todo.ts we have initialized the todo in ngOnInit() which will load all the data. We have used subscribe operator of the rx.js which is used by the http of angular.
Let us look into angular 2 todo.service.ts

In the above getTodoList() method the api’s get method is called using the service url and the output is mapped into the extractData with the response is being got from the Web API. In case of an error from the api, the error will be shown, which is extracted by the handleError method.

In saveTask() and delTask(), we use the same api to save the created task and delete the task created. But instead of using api’s get method, we use the post method which will post the task data back to the server, so the data is created/removed from the database repectively.
Let us add the service to the todo component, so it can be consumed by the todo app. You need to import the TodoService and also add the todoservice in the @Component, so it can be consumed via constructor.
Let us look into adding the task from the todo.ts, it is very important. This is where the data is properly transferred from one controller to another controller using the ionic beautiful feature.

When the add(+) button is clicked on the right hand corner of the todo page the add() method is called of todo.ts. In add method(as above), the modalctrl is created for the controller which we have added from the addtodo.ts
When you look(above) into the modal.onDidDismiss is called when the addtodo.ts(below) is dismissed where the model can be communicated back to the calling screen.

In the Addtodo.ts, the UI opens up, once the user enters the task and click on save. todoservice is called and then the api updates the database and the data is updated back to the main todo.ts thru the dismiss method. This way of communicating data back to the controller, makes your code looks more cleaner.
You can download the full code @ https://github.com/karthikeyanVK/Ionic2WebAPI.Net


